DIY Pantry Design in 7 Easy Steps
Part One: Design Your Pantry
We will be building our pantry ourselves and will share this over the next 8 weeks as part of the One Room Challenge for our Pantry Build. Make sure to join the newsletter to stay up to date with this project and many more.
After getting a ridiculous quote for cabinetry for our pantry we decided we would build it ourselves. But before we do that we need to design it.

I’m so excited to start planning our pantry, it’s been 2 years working with a kitchen with minimal storage and I need some space to get myself organised and inspired.
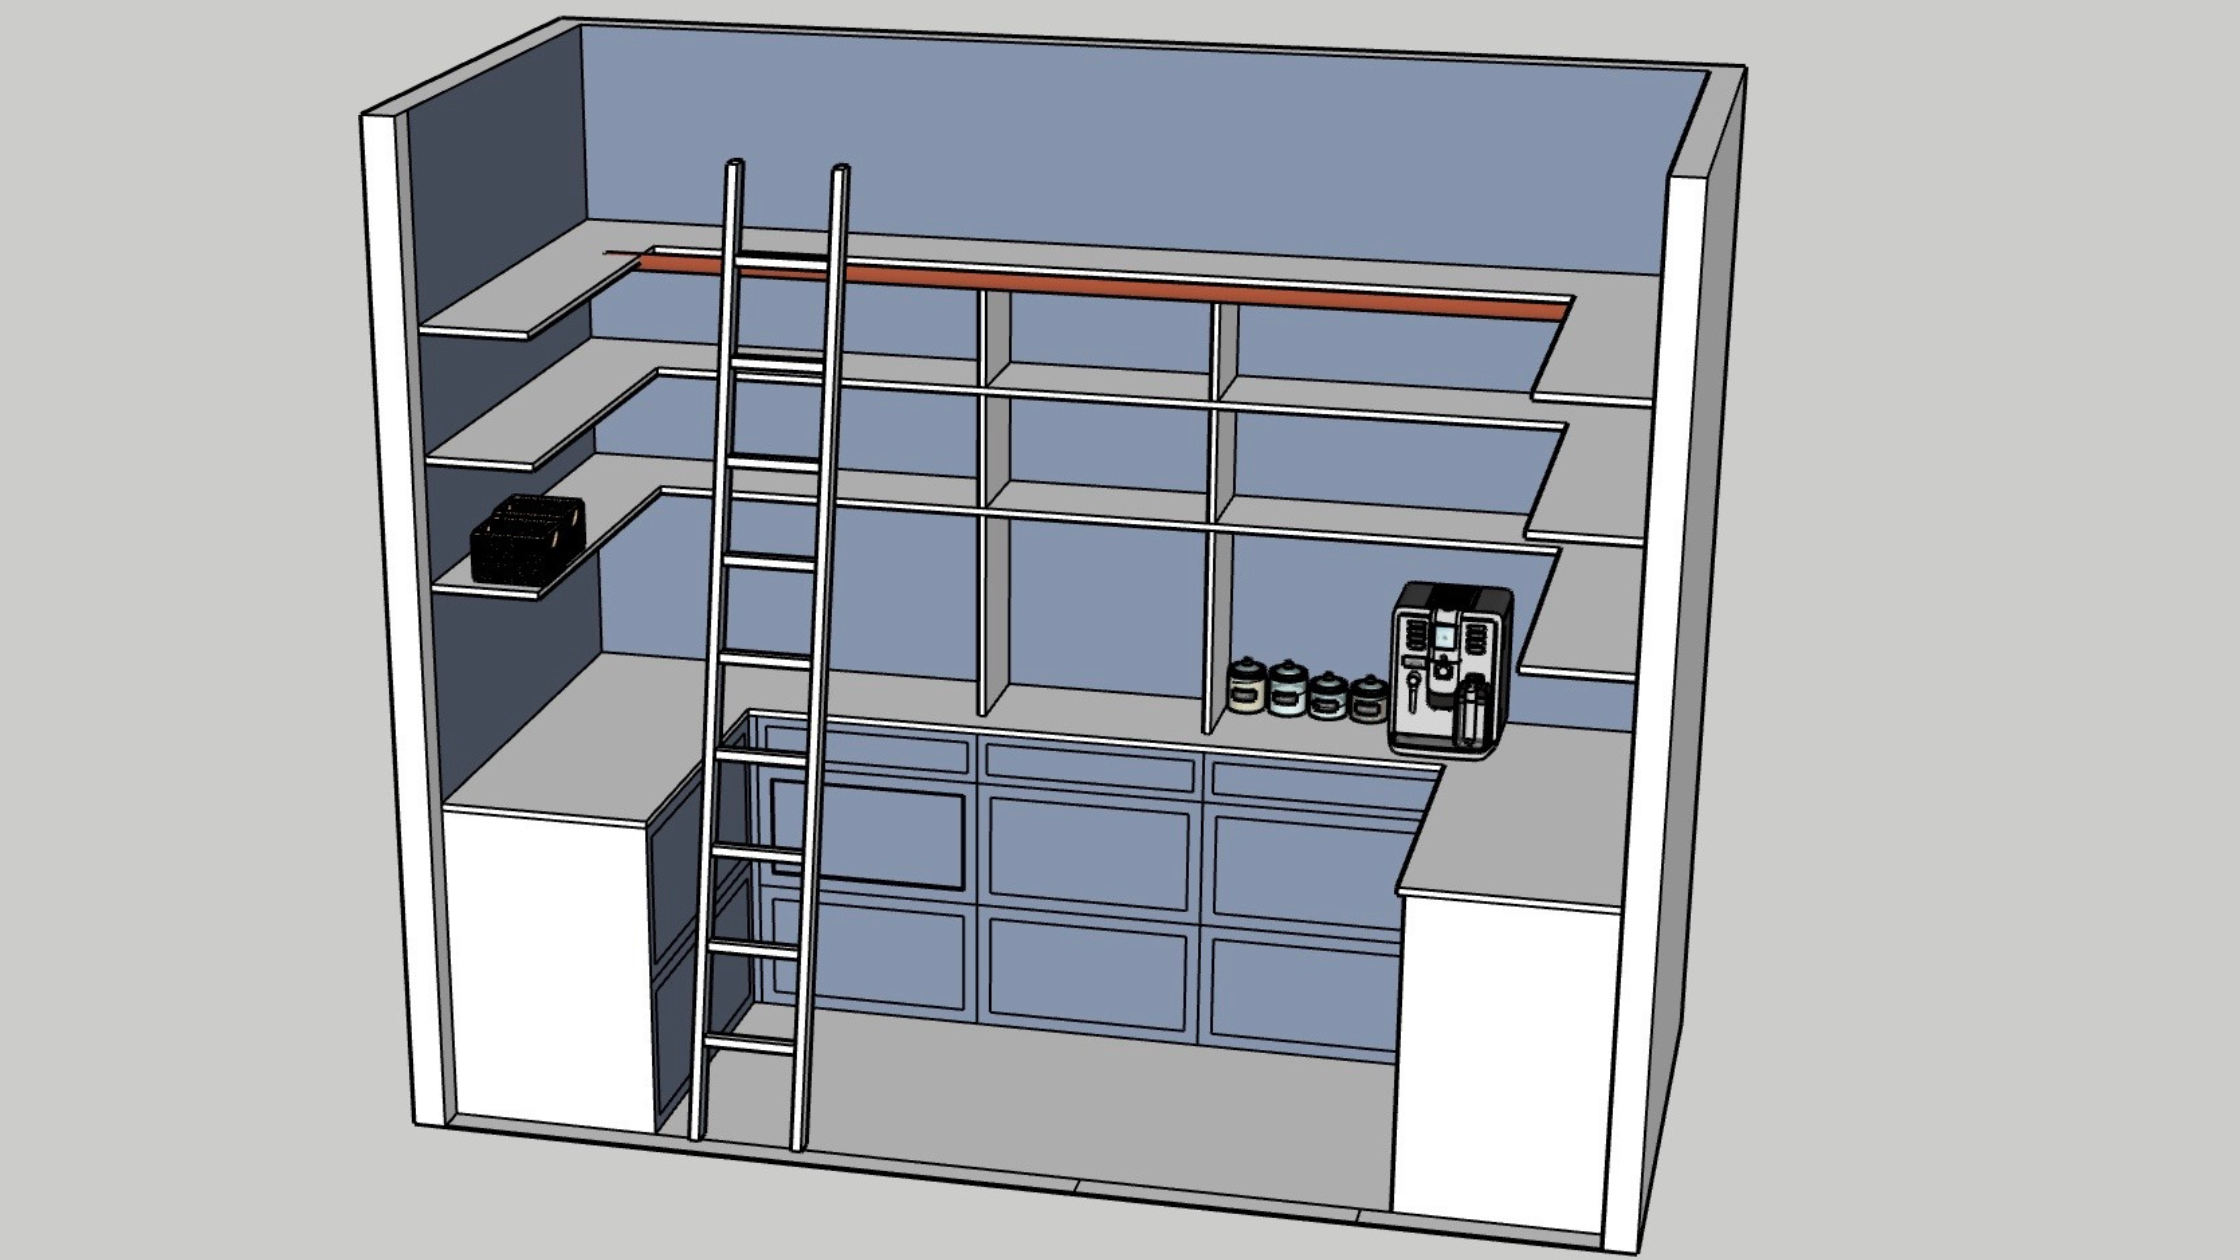
We plan to build our pantry so need to ensure we have accurate measurements to work from, for that reason I turned to SketchUp Pro for my final design.
There are a lot of ways you can create your perfect design, here’s my process.

Step One: Stare in the room for hours
Never rush your design. You invest a lot of time and money in your renovation or home makeover so take your time. If you’re remodelling a room then make a note of all of the things that frustrate you, the things you love, how you will use the room and your storage needs.

Step Two: Make a list
Write a list of all of the things you want to store in your pantry and group them so you can decide
As I am planning to have a clean kitchen I wanted all of my small appliances to be in our pantry.
- Kettle
- Coffee Machine
- Air fryer
- Microwave
- Blender
- Mixer
- Baking pans
- Baking utensils
- Coffee cups and pods
- Serving platters
- Toaster
- Stand up vacuum
- Bags
- Dry food
- Dog food

Step Three: Group the items you want to store
This activity will help you create some organisation to your storage.
Baking station
- Baking pans
- Ingredients
- Mixer
- Measuring cups and spoons
Coffee Station
- Coffee Machine
- Kettle
- Coffee pods and tea bags
- Cups
- Spoons
- Hot Chocolate
- Jug

Step Four: Put Pen to Paper
I will use a notepad to draft up some initial drawings, I’m not a very good drawer but it helps to put your ideas on paper, I will often draw or sketch ideas a few times. This helps to put all of the ideas from your head into your design and then you can start building on it.
As you have the items grouped together it will help you to organise the storage areas more effectively.

Step Five: Design
For our design I use Sketchup Pro. You don’t have to use a 3D model but it’s a great way to see your finished room before you start investing the big bucks.
You can sign up for a 30-day free trial. I’m relatively OK with design programs however I did not find SketchUp easy to navigate and found myself going down a youtube rabbit hole for days with little to show for it. So I invested in an online training program which was worth it’s weight in gold.
Here’s the link to the Sketchup Training I did. It’s not just for designers but also for people undergoing a renovation themselves, having the ability to make 3D plans will allow you to have more control and oversight into your design.
Measure the room or use the measurements from your plans to create the shell and consider the following:
- Built in Storage: Drawers versus shelves versus cupboards. Even if you have a smaller pantry I would certainly encourage you to consider drawers or, a more budget friendly option of baskets. You should be aiming to create a pantry is effective and there’s no point just filling it with shelves and having items lost to the depths of those shelves never to be seen again. If drawers aren’t in your budget then consider other storage options like baskets.
- Shelving: Consider the height and depth of your shelves based on the items you plan to store.
- Convenience: Always consider how you plan to use your pantry, what items will you use everyday versus occasionally. I plan to include a coffee station in our pantry, this will be used multiple times a day so I have allocated space just as you walk in the door or the pantry so it’s easily accessed. Other items such as my slow cooker is used mainly in winter and maybe once per week so I plan for this to be stored on the other side of the pantry, same as my baking items. I bake once per month, if that (unless it’s Christmas) so I plan to allocate space towards the back.
- Challenges: Consider the weight and accessibility of any items being stored and any challenges you may have. Maybe you have some hard-to-reach items; you’re unable to bend down to lower shelves or struggle to lift some of your appliances. These are all factors you need to consider when designing your pantry.
- Temporary Storage: This would include baskets, containers, boxes or whatever else you plan to use to store items. I don’t think you need to spend a fortune on storage containers, there are a lot of budget-friendly options out there. You could consider buying jars or containers in second-hand stores or on marketplace; mason jars are also a relatively inexpensive way to store items. Jars and canisters help to keep bugs, moths and other creepy crawlies out of your food items. You can have a sparkly clean pantry but still, attract unwanted guests.

Step Six: Budget and Timeline
Now you have a idea and design concept you need to determine how you plan to build your pantry. Are you hiring a carpenter, ordering cabinets or do you plan to DIY?
Once you know how you plan to build it and you have your design wishes you can start to plan your budget and timeline. Start sourcing items and determine the cost etc. You may find you have to make compromises or scale back in some areas if your initial plan doesn’t meet your budget. This exercise will help you to do that.
I use our renovation tracker to ensure I have thought of all of the additions and we have a clear budget to work toward. If you’d like our home renovation tracker you can download it here.

Step Seven: Build
I will share these steps with you over the coming weeks.
Any questions head over to our social pages @renowayoflife or email us at claire@claireoch.com
Happy renovating
Claire
Want more? Make sure to subscribe to our Newsletter
*This post may contains affiliate links, so we may earn a small commission when you make a purchase through links on our site at no additional cost to you. My opinions are my own.
Join
Work With Me


0 Comments